Pride Friendship Bracelets
06/16/2020 04:39:05 PM
Jen Szlasa
| Author | |
| Date Added |
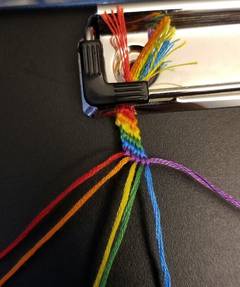
Each year for Pride Shabbat, we like to bring an accessible craft to the community. We try to make sure there are varying levels of difficulty to keep people of all ages engaged. Last year we accomplished that with a variety of designs to create your own rainbow yarmulke. This year, I’ll outline friendship bracelets, three ways. The first will be the simplest method: a 6-strand rainbow candy stripe. The second will be a 12-strand chevron. The third will be an alphabet pattern spelling out LOVE–AHAVAH in rainbow colors. Feel free to scroll down to whichever pattern/level of difficulty you’d prefer.
First up, you’ll need some string. My favorite is DMC, and here are the color IDs if you’re looking for an easy way to order online. They also have great photos of the entire palette on their website if you’re looking for a precise shade. Local shops can easily retrieve the floss by color name/ID for curbside pickup.

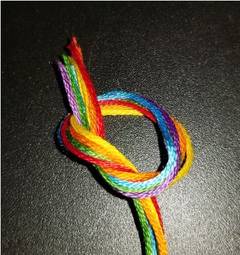
Candy Stripe
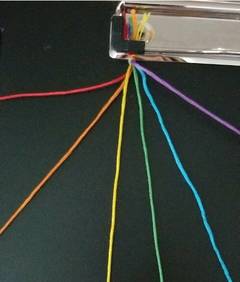
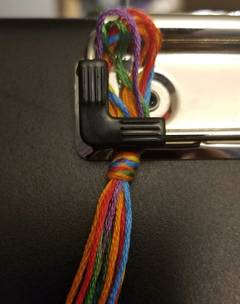
Start by cutting about 3 feet of each color: red, orange, yellow, green, blue, violet. Tie a knot at the end.
At this point, I sometimes include a safety pin in the knot to clip the bracelet to my clothing and keep it taut as I tie the knots. For this demo, I’ll be using a clipboard, which achieves the same goal.
If you’re adding a safety pin, do so now, and attach it to a pant leg to keep the bracelet in place and with you on the go. Alternative methods of securing the knot include the clipboard below or just taping the bracelet to your work surface. Spread out the colors, red to violet.
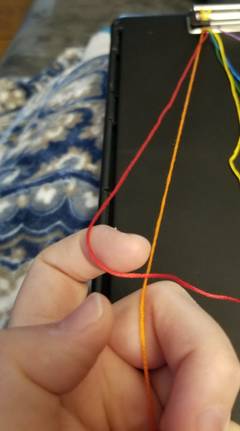
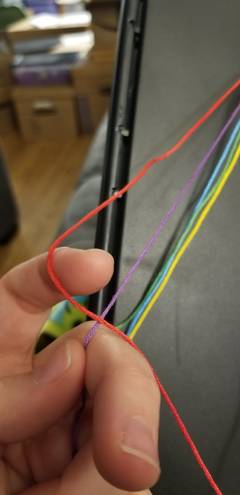
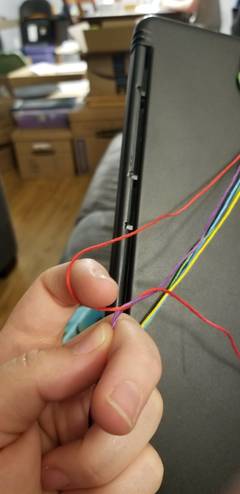
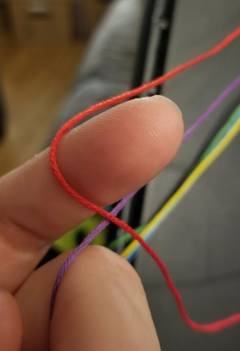
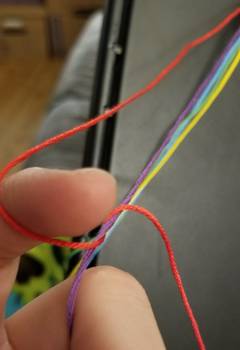
For the candy stripe, you’ll be using the same knot over and over again. It looks like this: arrange the two strings in the shape of a 4 by bringing the left string over the right and wrapping it underneath the right string (see figure below). Then repeat this same process again with those strings. This completes the “forward knot.” This knot swaps the position of the two colors so you can work a stripe across the whole bracelet. The entire bracelet will consist of forward knots with each color working your way from red to violet in succession.
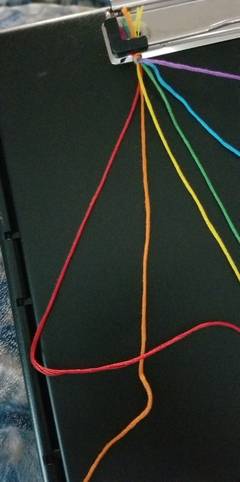
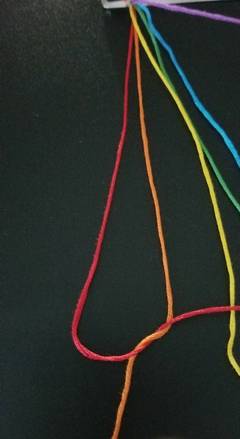
Forward knot: Take the red string, and tuck it under the orange string, then pull the knot tight, all the way to the top of the bracelet.
The knots may not look perfect on your first row. Don’t worry about it! Keep going one color at a time.
Once you get through the rainbow once, just keep repeating until the bracelet reaches your desired length!

Rainbow Chevron
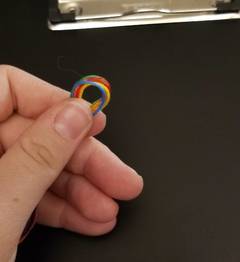
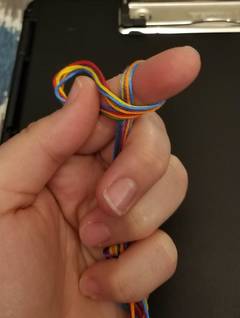
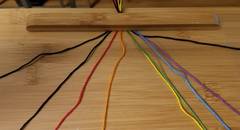
This will be largely the same as the candy stripe, but with a second knot variety and more strings to track. You’ll want to slightly more than double the length of string that was used for the first bracelet since they’ll be halved to make the pattern—approximately 7 feet should work. Again, you’ll want one of each color of the rainbow: red, orange, yellow, green, blue, violet. Tie a knot roughly the same as before, but leave a loop to help with tying the bracelet later.

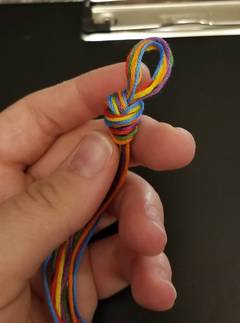
Fasten the bracelet:
Arrange your strings in rainbow order starting from the middle. This will result in the red appearing to be the top once the chevron forms.
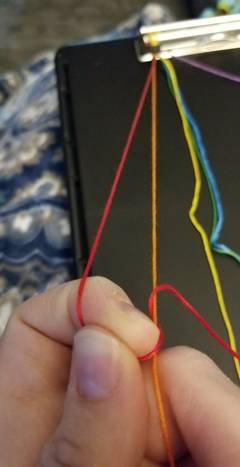
Start tying the forward knot across the strings from left to right. The first row of knots is the most important because it sets the order of the remaining strands. Start by tying violet over blue, then green, then yellow, then orange, then red.
Then tie a backward knot starting at the right-hand side and working your way through the same colors from right to left: blue, green, yellow, orange, red. If you need help visualizing the backward knot, I’ve included it below for the red string.
At this point, you’ll have your two violet strands in the middle. It doesn’t matter what knot you tie here since both strands are the same color. Continue the pattern with the remaining strings.
Forward knot:


Backward knot:


LOVE–AHAVAH Alphabet Pattern
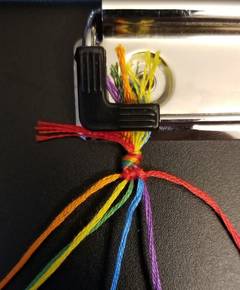
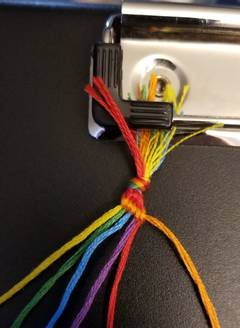
This last pattern is for an alphabet-style bracelet. Unlike the other patterns, this one consists of one very long string weaving back and forth across rows of background colors. Cut each color of the rainbow plus two black strands about 3 feet long. Measure about 9 feet of black string as the leading strand. Tie a knot at the top and fasten like the other examples. Arrange in rainbow order with one black strand on each far side and the long strand at the left.

Start with the leading (long black) string, tying forward knots across the rainbow strands left to right, slightly angling the knots to keep the line straight. Then tie backwards knots from right to left to establish the foreground color. The colored knots appear by tying a knot in the opposite direction to the leading strand. For example, for the L, start with a forward knot tied with the leading strand, then tie backward knots with each of the rainbow colors (red, then orange, then yellow, etc.) to get the vertical line of the L. Then tie a forward and a backward knot with the long background strand on the right black strand. Work your way back from right to left tying backward knots using the leading strand, tying a forward knot with the red to start the horizontal part of the L. Continue with this method to complete the entire words: LOVE–AHAVAH
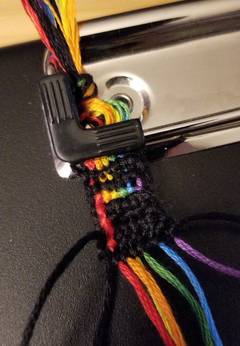

Friendship bracelet pattern: I flipped the rainbow on my bracelet, but both orientations work great!

I went ahead and added a candy stripe at the end just for a fun flourish. Feel free to get creative with the pattern once you learn the basic knots!


October 23, 2025
1 Cheshvan 5786
Worship Schedule
-
Friday ,
OctOctober 24 , 2025Shabbat Worship
Friday, Oct 24th 6:00 pm to 7:15 pm
-
Saturday ,
OctOctober 25 , 2025Torah Study
Saturday, Oct 25th 9:00 am to 10:00 am
-
Saturday ,
OctOctober 25 , 2025Seth Yampolsky Bar Mitzvah
Saturday, Oct 25th 10:30 am to 12:00 pm
-
Friday ,
OctOctober 31 , 2025Shabbat Worship
Friday, Oct 31st 6:00 pm to 7:15 pm
-
Saturday ,
NovNovember 1 , 2025Torah Study
Saturday, Nov 1st 9:00 am to 10:00 am
-
Friday ,
NovNovember 7 , 2025Swarsensky Memorial Weekend Shabbat Worship: Can the Interfaith Endeavor Survive Today’s Schisms?
Friday, Nov 7th 6:00 pm to 7:15 pm
Swarsensky Memorial Weekend Shabbat Worship including Rabbi Dena Feingold speaking on "Can the Interfaith Endeavor Survive Today’s Schisms?" -
Saturday ,
NovNovember 8 , 2025Torah Study
Saturday, Nov 8th 9:00 am to 10:00 am
-
Friday ,
NovNovember 14 , 2025Likrat Shabbat (Welcoming Shabbat)
Friday, Nov 14th 6:00 pm to 7:00 pm
The first Friday of each month is an all-ages Shabbat service with participation by Religious School students. Join us in welcoming Shabbat as students from each grade participate by leading a portion of the worship. -
Saturday ,
NovNovember 15 , 2025Torah Study
Saturday, Nov 15th 9:00 am to 10:00 am
-
Friday ,
NovNovember 21 , 2025Shabbat Midor Lador
Friday, Nov 21st 6:00 pm to 7:15 pm
A musical service for the whole Temple family, with Les Goldsmith and the Promised Band. -
Saturday ,
NovNovember 22 , 2025Torah Study
Saturday, Nov 22nd 9:00 am to 10:00 am
-
Saturday ,
NovNovember 22 , 2025Samuel Riley Bar Mitzvah
Saturday, Nov 22nd 10:30 am to 12:00 pm
-
Friday ,
NovNovember 28 , 2025Shabbat Worship
Friday, Nov 28th 6:00 pm to 7:15 pm
-
Saturday ,
NovNovember 29 , 2025Torah Study
Saturday, Nov 29th 9:00 am to 10:00 am
-
Friday ,
DecDecember 5 , 2025Likrat Shabbat (Welcoming Shabbat)
Friday, Dec 5th 6:00 pm to 7:00 pm
The first Friday of each month is an all-ages Shabbat service with participation by Religious School students. Join us in welcoming Shabbat as students from each grade participate by leading a portion of the worship. -
Saturday ,
DecDecember 6 , 2025Torah Study
Saturday, Dec 6th 9:00 am to 10:00 am
-
Saturday ,
DecDecember 6 , 2025Elliot Margulius Bar Mitzvah
Saturday, Dec 6th 10:30 am to 12:00 pm
-
Friday ,
DecDecember 12 , 2025Shabbat Worship
Friday, Dec 12th 6:00 pm to 7:15 pm
-
Saturday ,
DecDecember 13 , 2025Torah Study
Saturday, Dec 13th 9:00 am to 10:00 am
-
Saturday ,
DecDecember 13 , 2025Orion Dvir Bar Mitzvah
Saturday, Dec 13th 10:30 am to 12:00 pm
-
Friday ,
DecDecember 19 , 2025Shabbat Midor Lador
Friday, Dec 19th 6:00 pm to 7:15 pm
A musical service for the whole Temple family, with Les Goldsmith and the Promised Band. -
Saturday ,
DecDecember 20 , 2025Torah Study
Saturday, Dec 20th 9:00 am to 10:00 am
-
Friday ,
DecDecember 26 , 2025Shabbat Worship
Friday, Dec 26th 6:00 pm to 7:15 pm
-
Saturday ,
DecDecember 27 , 2025Torah Study
Saturday, Dec 27th 9:00 am to 10:00 am
-
Friday ,
JanJanuary 2 , 2026Shabbat Worship
Friday, Jan 2nd 6:00 pm to 7:15 pm
-
Saturday ,
JanJanuary 3 , 2026Torah Study
Saturday, Jan 3rd 9:00 am to 10:00 am
-
Friday ,
JanJanuary 9 , 2026Shabbat Worship
Friday, Jan 9th 6:00 pm to 7:15 pm
-
Saturday ,
JanJanuary 10 , 2026Torah Study
Saturday, Jan 10th 9:00 am to 10:00 am
-
Friday ,
JanJanuary 16 , 2026Shabbat Midor Lador
Friday, Jan 16th 6:00 pm to 7:15 pm
A musical service for the whole Temple family, with Les Goldsmith and the Promised Band. -
Saturday ,
JanJanuary 17 , 2026Torah Study
Saturday, Jan 17th 9:00 am to 10:00 am
-
Saturday ,
JanJanuary 17 , 2026Caitlin Sullivan Bat Mitzvah
Saturday, Jan 17th 10:30 am to 12:00 pm
-
Friday ,
JanJanuary 23 , 2026Shabbat Worship
Friday, Jan 23rd 6:00 pm to 7:15 pm
-
Saturday ,
JanJanuary 24 , 2026Torah Study
Saturday, Jan 24th 9:00 am to 10:00 am
-
Saturday ,
JanJanuary 24 , 2026Penelope Becker Bat Mitzvah
Saturday, Jan 24th 10:30 am to 12:00 pm
-
Friday ,
JanJanuary 30 , 2026Shabbat Worship
Friday, Jan 30th 6:00 pm to 7:15 pm
-
Saturday ,
JanJanuary 31 , 2026Torah Study
Saturday, Jan 31st 9:00 am to 10:00 am
-
Friday ,
FebFebruary 6 , 2026Likrat Shabbat (Welcoming Shabbat)
Friday, Feb 6th 6:00 pm to 7:00 pm
The first Friday of each month is an all-ages Shabbat service with participation by Religious School students. Join us in welcoming Shabbat as students from each grade participate by leading a portion of the worship. -
Saturday ,
FebFebruary 7 , 2026Torah Study
Saturday, Feb 7th 9:00 am to 10:00 am
-
Friday ,
FebFebruary 13 , 2026Shabbat Worship
Friday, Feb 13th 6:00 pm to 7:15 pm
-
Saturday ,
FebFebruary 14 , 2026Torah Study
Saturday, Feb 14th 9:00 am to 10:00 am
-
Friday ,
FebFebruary 20 , 2026Shabbat Midor Lador
Friday, Feb 20th 6:00 pm to 7:15 pm
A musical service for the whole Temple family, with Les Goldsmith and the Promised Band. -
Saturday ,
FebFebruary 21 , 2026Torah Study
Saturday, Feb 21st 9:00 am to 10:00 am
-
Friday ,
FebFebruary 27 , 2026Shabbat Worship with Sisterhood
Friday, Feb 27th 6:00 pm to 7:00 pm
Join us for Sisterhood Shabbat, one of the most beautiful and meaningful services of the year. -
Saturday ,
FebFebruary 28 , 2026Torah Study
Saturday, Feb 28th 9:00 am to 10:00 am
-
Friday ,
MarMarch 6 , 2026Likrat Shabbat (Welcoming Shabbat)
Friday, Mar 6th 6:00 pm to 7:00 pm
The first Friday of each month is an all-ages Shabbat service with participation by Religious School students. Join us in welcoming Shabbat as students from each grade participate by leading a portion of the worship. -
Saturday ,
MarMarch 7 , 2026Torah Study
Saturday, Mar 7th 9:00 am to 10:00 am
-
Saturday ,
MarMarch 7 , 2026Leila Lazar Bat Mizvah
Saturday, Mar 7th 10:30 am to 12:00 pm
-
Saturday ,
MarMarch 7 , 2026Leila Lazar Bat Mitzvah
Saturday, Mar 7th 10:30 am to 12:00 pm
-
Friday ,
MarMarch 13 , 2026Men's Club Shabbat
Friday, Mar 13th 6:00 pm to 7:15 pm
Join us for Shabbat worship with participation by the Men's Club of Temple Beth El. -
Saturday ,
MarMarch 14 , 2026Torah Study
Saturday, Mar 14th 9:00 am to 10:00 am
-
Saturday ,
MarMarch 14 , 2026Ezra Friedman Bar Mitzvah
Saturday, Mar 14th 10:30 am to 12:00 pm
-
Friday ,
MarMarch 20 , 2026Shabbat Midor Lador
Friday, Mar 20th 6:00 pm to 7:15 pm
A musical service for the whole Temple family, with Les Goldsmith and the Promised Band. -
Saturday ,
MarMarch 21 , 2026Torah Study
Saturday, Mar 21st 9:00 am to 10:00 am
-
Friday ,
MarMarch 27 , 2026Shabbat Worship
Friday, Mar 27th 6:00 pm to 7:15 pm
-
Saturday ,
MarMarch 28 , 2026Torah Study
Saturday, Mar 28th 9:00 am to 10:00 am
-
Friday ,
AprApril 3 , 2026Likrat Shabbat (Welcoming Shabbat)
Friday, Apr 3rd 6:00 pm to 7:00 pm
The first Friday of each month is an all-ages Shabbat service with participation by Religious School students. Join us in welcoming Shabbat as students from each grade participate by leading a portion of the worship. -
Saturday ,
AprApril 4 , 2026Torah Study
Saturday, Apr 4th 9:00 am to 10:00 am
-
Friday ,
AprApril 10 , 2026Shabbat Worship
Friday, Apr 10th 6:00 pm to 7:15 pm
-
Saturday ,
AprApril 11 , 2026Torah Study
Saturday, Apr 11th 9:00 am to 10:00 am
-
Saturday ,
AprApril 11 , 2026Lital Adelman Bat Mitzvah
Saturday, Apr 11th 10:30 am to 12:00 pm
-
Friday ,
AprApril 17 , 2026Shabbat Midor Lador
Friday, Apr 17th 6:00 pm to 7:15 pm
A musical service for the whole Temple family, with Les Goldsmith and the Promised Band. -
Saturday ,
AprApril 18 , 2026Torah Study
Saturday, Apr 18th 9:00 am to 10:00 am
-
Friday ,
AprApril 24 , 2026Shabbat Worship
Friday, Apr 24th 6:00 pm to 7:15 pm
-
Saturday ,
AprApril 25 , 2026Torah Study
Saturday, Apr 25th 9:00 am to 10:00 am
-
Saturday ,
AprApril 25 , 2026Aviva Barak Bat Mitzvah
Saturday, Apr 25th 10:30 am to 12:00 pm
-
Friday ,
MayMay 1 , 2026Likrat Shabbat (Welcoming Shabbat)
Friday, May 1st 6:00 pm to 7:00 pm
The first Friday of each month is an all-ages Shabbat service with participation by Religious School students. Join us in welcoming Shabbat as students from each grade participate by leading a portion of the worship. -
Saturday ,
MayMay 2 , 2026Torah Study
Saturday, May 2nd 9:00 am to 10:00 am
-
Saturday ,
MayMay 2 , 2026Jada Deano Bat Mitzvah
Saturday, May 2nd 10:30 am to 12:00 pm
-
Friday ,
MayMay 8 , 2026Shabbat Worship
Friday, May 8th 6:00 pm to 7:15 pm
-
Saturday ,
MayMay 9 , 2026Torah Study
Saturday, May 9th 9:00 am to 10:00 am
-
Friday ,
MayMay 15 , 2026Shabbat Midor Lador
Friday, May 15th 6:00 pm to 7:15 pm
A musical service for the whole Temple family, with Les Goldsmith and the Promised Band. -
Saturday ,
MayMay 16 , 2026Torah Study
Saturday, May 16th 9:00 am to 10:00 am
-
Friday ,
MayMay 22 , 2026Shabbat Worship
Friday, May 22nd 6:00 pm to 7:15 pm
-
Saturday ,
MayMay 23 , 2026Torah Study
Saturday, May 23rd 9:00 am to 10:00 am
-
Friday ,
MayMay 29 , 2026Shabbat Worship
Friday, May 29th 6:00 pm to 7:15 pm
-
Saturday ,
MayMay 30 , 2026Torah Study
Saturday, May 30th 9:00 am to 10:00 am
-
Saturday ,
MayMay 30 , 2026Torah Study
Saturday, May 30th 9:00 am to 10:00 am
-
Saturday ,
MayMay 30 , 2026Bert LeBarron Bar Mitzvah
Saturday, May 30th 10:30 am to 12:00 pm
-
Friday ,
JunJune 5 , 2026Shabbat Worship
Friday, Jun 5th 6:00 pm to 7:15 pm
-
Saturday ,
JunJune 6 , 2026Torah Study
Saturday, Jun 6th 9:00 am to 10:00 am
-
Saturday ,
JunJune 6 , 2026Sally Raether Bat Mitzvah
Saturday, Jun 6th 10:30 am to 12:00 pm
-
Friday ,
JunJune 12 , 2026Shabbat Worship
Friday, Jun 12th 6:00 pm to 7:15 pm
-
Saturday ,
JunJune 13 , 2026Torah Study
Saturday, Jun 13th 9:00 am to 10:00 am
-
Saturday ,
JunJune 13 , 2026Levi Trost Bar Mitzvah
Saturday, Jun 13th 10:30 am to 12:00 pm
-
Friday ,
JunJune 19 , 2026Shabbat Midor Lador
Friday, Jun 19th 6:00 pm to 7:15 pm
A musical service for the whole Temple family, with Les Goldsmith and the Promised Band. -
Saturday ,
JunJune 20 , 2026Torah Study
Saturday, Jun 20th 9:00 am to 10:00 am
-
Friday ,
JunJune 26 , 2026Shabbat Worship
Friday, Jun 26th 6:00 pm to 7:15 pm
-
Saturday ,
JunJune 27 , 2026Torah Study
Saturday, Jun 27th 9:00 am to 10:00 am
-
Saturday ,
JunJune 27 , 2026Emerson Spector Bat Mitzvah
Saturday, Jun 27th 10:30 am to 12:00 pm
-
Saturday ,
JulJuly 4 , 2026Torah Study
Saturday, Jul 4th 9:00 am to 10:00 am
-
Saturday ,
JulJuly 11 , 2026Torah Study
Saturday, Jul 11th 9:00 am to 10:00 am
-
Friday ,
JulJuly 17 , 2026Shabbat Midor Lador
Friday, Jul 17th 6:00 pm to 7:15 pm
A musical service for the whole Temple family, with Les Goldsmith and the Promised Band. -
Saturday ,
JulJuly 18 , 2026Torah Study
Saturday, Jul 18th 9:00 am to 10:00 am
-
Saturday ,
JulJuly 25 , 2026Torah Study
Saturday, Jul 25th 9:00 am to 10:00 am
-
Saturday ,
JulJuly 25 , 2026Sophie Wistrom Bat Mitzvah
Saturday, Jul 25th 10:30 am to 1:00 pm
-
Saturday ,
AugAugust 1 , 2026Torah Study
Saturday, Aug 1st 9:00 am to 10:00 am
-
Saturday ,
AugAugust 1 , 2026Rosemary Wright Bat Mitzvah
Saturday, Aug 1st 10:30 am to 12:00 pm
-
Saturday ,
AugAugust 8 , 2026Torah Study
Saturday, Aug 8th 9:00 am to 10:00 am
-
Saturday ,
AugAugust 8 , 2026Ayla Mandel Bat Mitzvah
Saturday, Aug 8th 10:30 am to 12:00 pm
-
Saturday ,
AugAugust 15 , 2026Torah Study
Saturday, Aug 15th 9:00 am to 10:00 am
Engage with us!
-
Friday ,
OctOctober 17 , 2025Goodman Thanksgiving Basket Donations
Friday, Oct 17th (All day)
We are collecting specific foods for the Goodman Community Center’s 37th annual Thanksgiving Basket Drive to provide 4,000 Dane County families with the groceries they need to make a traditional holiday meal. -
Thursday ,
OctOctober 23 , 2025Monthly Meditation
Thursday, Oct 23rd 7:00 pm to 8:00 pm
Please join us as we continue the growth in our community around spiritual practice and meditation. -
Friday ,
OctOctober 24 , 2025Pre-Shabbat Nosh
Friday, Oct 24th 5:15 pm to 6:00 pm
Please join us for a light nosh before services. -
Saturday ,
OctOctober 25 , 2025Blessing of the Animals
Saturday, Oct 25th 3:00 pm to 4:00 pm
In celebration of Parashat Noach, which highlights the sacred responsibility of caring for all of God’s creatures, bring your (well-behaved) pets for an outdoor ceremony where clergy will offer blessings for the animals in our lives. -
Sunday ,
OctOctober 26 , 2025Judaica Shop Open
Sunday, Oct 26th 9:00 am to 12:00 pm
Temple Beth El Sisterhood runs our Judaica shop, the only dedicated Judaica shop in Madison. Stock up on Hanukkah, Shabbat, and other Judaica items. -
Sunday ,
OctOctober 26 , 2025Joel Pedersen Memorial Lecture with Jonathan Patz
Sunday, Oct 26th 9:30 am to 11:30 am
Please join us for the Joel Pedersen Memorial Lecture on tikkun olam and the environment. -
Sunday ,
OctOctober 26 , 2025JEWniors Bowling
Sunday, Oct 26th 2:00 pm to 4:00 pm
JEWniors (3rd–5th graders) are going bowling! Join us for an afternoon of fun at Schwoegler's. -
Wednesday ,
OctOctober 29 , 2025Sisterhood Watercolor Night with Erin Gleeson
Wednesday, Oct 29th 6:00 pm to 9:00 pm
Join TBE's Sisterhood for a night of watercolors and dinner with Erin Gleeson. -
Wednesday ,
OctOctober 29 , 2025Midrasha
Wednesday, Oct 29th 6:15 pm to 9:00 pm
Midrasha Hebrew High School -
Friday ,
OctOctober 31 , 2025Pre-Shabbat Nosh
Friday, Oct 31st 5:15 pm to 6:00 pm
Please join us for a light nosh before services. -
Sunday ,
NovNovember 2 , 2025Judaica Shop Open
Sunday, Nov 2nd 9:00 am to 12:00 pm
Temple Beth El Sisterhood runs our Judaica shop, the only dedicated Judaica shop in Madison. Stock up on Hanukkah, Shabbat, and other Judaica items. -
Sunday ,
NovNovember 2 , 2025Parent/Guardian Koffee Kibbitz
Sunday, Nov 2nd 9:30 am to 10:30 am
Gather at Café Panim with other parents/guardians from your student's grade and get to know each other while your students are in Religious School. -
Sunday ,
NovNovember 2 , 2025Youth Day
Sunday, Nov 2nd 11:45 am to 1:00 pm
Youth Day activities are for JEWniors (3rd–5th graders) and MuTTY (6th–8th graders). After a quick pizza lunch we will do an activity together. Our goal is to build relationships and create fun and relaxed Jewish spaces. -
Sunday ,
NovNovember 2 , 2025Food-A-Rama Volunteer Sessions
Sunday, Nov 2nd 12:00 pm to 3:00 pm
-
Sunday ,
NovNovember 2 , 2025Food-A-Rama Volunteer Sessions
Sunday, Nov 2nd 12:00 pm to 8:00 pm
-
Monday ,
NovNovember 3 , 2025Food-A-Rama Volunteer Sessions
Monday, Nov 3rd 4:00 pm to 8:00 pm
-
Tuesday ,
NovNovember 4 , 2025Food-A-Rama Volunteer Sessions
Tuesday, Nov 4th 7:30 am to 4:00 pm
-
Tuesday ,
NovNovember 4 , 2025Judaica Shop Open
Tuesday, Nov 4th 10:00 am to 2:00 pm
Temple Beth El Sisterhood runs our Judaica shop, the only dedicated Judaica shop in Madison. Stock up on Hanukkah, Shabbat, and other Judaica items. -
Tuesday ,
NovNovember 4 , 202559th Annual Food-A-Rama
Tuesday, Nov 4th 10:30 am to 2:00 pm
Enjoy delicious deli-style lunches for dine-in, pickup, or delivery. Quantities are limited, so order now! -
Wednesday ,
NovNovember 5 , 2025Midrasha
Wednesday, Nov 5th 6:15 pm to 9:00 pm
Midrasha Hebrew High School -
Thursday ,
NovNovember 6 , 2025House Committee Meeting
Thursday, Nov 6th 6:00 pm to 7:30 pm
-
Thursday ,
NovNovember 6 , 2025CANCELED: Social Action Committee Meeting
Thursday, Nov 6th 7:00 pm to 9:00 pm
Social Action Committee meetings are held at 7:00 pm on the first Thursday of most months at Temple Beth El. -
Friday ,
NovNovember 7 , 2025Singles Creating Community Coffee Klatch
Friday, Nov 7th 9:00 am to 10:30 am
Please join the Singles Creating Community group for breakfast. -
Friday ,
NovNovember 7 , 2025Pre-Shabbat Nosh
Friday, Nov 7th 5:15 pm to 6:00 pm
Please join us for a light nosh before services. -
Sunday ,
NovNovember 9 , 2025Judaica Shop Open
Sunday, Nov 9th 9:00 am to 12:00 pm
Temple Beth El Sisterhood runs our Judaica shop, the only dedicated Judaica shop in Madison. Stock up on Hanukkah, Shabbat, and other Judaica items. -
Sunday ,
NovNovember 9 , 2025Swarsensky Memorial Brunch: Zionism and American Jews After October 7
Sunday, Nov 9th 9:45 am to 12:00 pm
-
Sunday ,
NovNovember 9 , 2025MaTTY Bowling Night
Sunday, Nov 9th 5:30 pm to 7:30 pm
-
Tuesday ,
NovNovember 11 , 2025Office Closed
Tuesday, Nov 11th (All day)
-
Wednesday ,
NovNovember 12 , 2025Mitzvah Winter Holiday Shoeboxes for Nehemiah and FOSTER
Wednesday, Nov 12th (All day)
Help provide gifts for children and adults who might not otherwise receive any gifts in the 2025 holiday season who are clients of Nehemiah and FOSTER. -
Wednesday ,
NovNovember 12 , 2025Midrasha
Wednesday, Nov 12th 6:15 pm to 9:00 pm
Midrasha Hebrew High School -
Thursday ,
NovNovember 13 , 2025Board Meeting
Thursday, Nov 13th 7:30 pm to 8:30 pm
-
Friday ,
NovNovember 14 , 2025Likrat Shabbat Family Dinner
Friday, Nov 14th 5:15 pm to 6:00 pm
Join us for a light dinner preceding our Likrat Shabbat (Welcoming Shabbat) service on the first Friday of the month, November–May. Dinner is $18 per family unit/household. Please note: there is not a special Likrat Shabbat service on the first Friday in January. -
Friday ,
NovNovember 14 , 2025Pre-Shabbat Nosh
Friday, Nov 14th 5:15 pm to 6:00 pm
Please join us for a light nosh before services. -
Sunday ,
NovNovember 16 , 2025TBE Bakers
Sunday, Nov 16th 9:00 am to 12:00 pm
Join us for Sunday sessions where we will create community while baking delicious treats to share with the congregation at upcoming Temple Beth El events. -
Sunday ,
NovNovember 16 , 2025Judaica Shop Open
Sunday, Nov 16th 9:00 am to 12:00 pm
Temple Beth El Sisterhood runs our Judaica shop, the only dedicated Judaica shop in Madison. Stock up on Hanukkah, Shabbat, and other Judaica items. -
Sunday ,
NovNovember 16 , 2025Sunday School for Adults
Sunday, Nov 16th 9:30 am to 10:30 am
This monthly course is an opportunity for adults who missed having a formal Jewish education, or would like a refresher, to have a parallel learning experience while their students are in Religious School. -
Sunday ,
NovNovember 16 , 2025Parent/Guardian Koffee Kibbitz
Sunday, Nov 16th 9:30 am to 10:30 am
Gather at Café Panim with other parents/guardians from your student's grade and get to know each other while your students are in Religious School. -
Sunday ,
NovNovember 16 , 2025Tots and Tunes
Sunday, Nov 16th 10:45 am to 11:45 am
This song and craft program for families with children ages 0–5 is open to the entire Madison Jewish community. -
Monday ,
NovNovember 17 , 2025Fiber Arts Schmooze
Monday, Nov 17th 7:00 pm to 8:30 pm
Join friends at TBE for an evening of knitting, crocheting, stitching, and friendship! -
Tuesday ,
NovNovember 18 , 2025Sisterhood "Monthly Mingle" Lunch
Tuesday, Nov 18th 12:00 pm to 1:00 pm
Join us for a Sisterhood lunch! -
Tuesday ,
NovNovember 18 , 2025Serve Supper at the Catholic Multicultural Center
Tuesday, Nov 18th 3:30 pm to 5:30 pm
Join fellow TBE volunteers on the third Tuesday of each month to help serve dinner and clean up. -
Tuesday ,
NovNovember 18 , 2025Environment and Climate Change Action Team Meeting
Tuesday, Nov 18th 7:00 pm to 8:00 pm
Join our action team as we make plans to engage the congregation in activities that raise awareness about environmental issues. We meet on Zoom. -
Wednesday ,
NovNovember 19 , 2025ROMEO (Retired Old Men Eating Out)
Wednesday, Nov 19th 12:00 pm to 1:00 pm
-
Wednesday ,
NovNovember 19 , 2025Judaica Shop Open
Wednesday, Nov 19th 4:00 pm to 6:15 pm
Temple Beth El Sisterhood runs our Judaica shop, the only dedicated Judaica shop in Madison. Stock up on Hanukkah, Shabbat, and other Judaica items. -
Wednesday ,
NovNovember 19 , 2025Singles Creating Community Dinner
Wednesday, Nov 19th 6:00 pm to 8:30 pm
Join the Singles Creating Community group for a dinner gathering. -
Wednesday ,
NovNovember 19 , 2025Midrasha
Wednesday, Nov 19th 6:15 pm to 9:00 pm
Midrasha Hebrew High School -
Wednesday ,
NovNovember 19 , 2025Men's Club Book Group
Wednesday, Nov 19th 7:30 pm to 9:00 pm
The Men's Club Book Group will gather to discuss "The Names" a novel by Florence Knapp. -
Thursday ,
NovNovember 20 , 2025Play Mahjong with Sisterhood
Thursday, Nov 20th 1:30 pm to 3:30 pm
Join Sisterhood for a fun afternoon of Mahjong! -
Thursday ,
NovNovember 20 , 2025Families with Young Children Friendsgiving Potluck and Challah-Making Extravaganza!
Thursday, Nov 20th 5:00 pm to 7:00 pm
Gather with your friends for an unforgettable Friendsgiving potluck celebration and challah-making workshop! -
Friday ,
NovNovember 21 , 2025Pre-Shabbat Nosh
Friday, Nov 21st 5:15 pm to 6:00 pm
Please join us for a light nosh before services. -
Sunday ,
NovNovember 23 , 2025Judaica Shop Open
Sunday, Nov 23rd 9:00 am to 12:00 pm
Temple Beth El Sisterhood runs our Judaica shop, the only dedicated Judaica shop in Madison. Stock up on Hanukkah, Shabbat, and other Judaica items. -
Sunday ,
NovNovember 23 , 2025Parent/Guardian Koffee Kibbitz
Sunday, Nov 23rd 9:30 am to 10:30 am
Gather at Café Panim with other parents/guardians from your student's grade and get to know each other while your students are in Religious School. -
Wednesday ,
NovNovember 26 , 2025Office Closes at 12:00 pm
Wednesday, Nov 26th 12:00 pm to 5:00 pm
-
Thursday ,
NovNovember 27 , 2025Office Closed for Thanksgiving
Thursday, Nov 27th (All day)
-
Friday ,
NovNovember 28 , 2025Pre-Shabbat Nosh
Friday, Nov 28th 5:15 pm to 6:00 pm
Please join us for a light nosh before services. -
Tuesday ,
DecDecember 2 , 2025Contemplative Writing Workshop
Tuesday, Dec 2nd 6:00 pm to 8:00 pm
Amelie Davidson will lead a small group on a contemplative writing journey. -
Wednesday ,
DecDecember 3 , 2025Judaica Shop Open
Wednesday, Dec 3rd 4:00 pm to 6:15 pm
Temple Beth El Sisterhood runs our Judaica shop, the only dedicated Judaica shop in Madison. Stock up on Hanukkah, Shabbat, and other Judaica items. -
Wednesday ,
DecDecember 3 , 2025Midrasha
Wednesday, Dec 3rd 6:15 pm to 9:00 pm
Midrasha Hebrew High School -
Thursday ,
DecDecember 4 , 2025House Committee Meeting
Thursday, Dec 4th 6:00 pm to 7:30 pm
-
Thursday ,
DecDecember 4 , 2025Social Action Committee Meeting
Thursday, Dec 4th 7:00 pm to 9:00 pm
Social Action Committee meetings are held at 7:00 pm on the first Thursday of most months at Temple Beth El. -
Thursday ,
DecDecember 4 , 2025Sisterhood Exec Committee Meeting
Thursday, Dec 4th 7:00 pm to 8:30 pm
-
Friday ,
DecDecember 5 , 2025Singles Creating Community Coffee Klatch
Friday, Dec 5th 9:00 am to 10:30 am
Please join the Singles Creating Community group for breakfast. -
Friday ,
DecDecember 5 , 2025Likrat Shabbat Family Dinner
Friday, Dec 5th 5:15 pm to 6:00 pm
Join us for a light dinner preceding our Likrat Shabbat (Welcoming Shabbat) service on the first Friday of the month, November–May. Dinner is $18 per family unit/household. Please note: there is not a special Likrat Shabbat service on the first Friday in January. -
Friday ,
DecDecember 5 , 2025Pre-Shabbat Nosh
Friday, Dec 5th 5:15 pm to 6:00 pm
Please join us for a light nosh before services. -
Sunday ,
DecDecember 7 , 2025TBE Bakers
Sunday, Dec 7th 9:00 am to 12:00 pm
Join us for Sunday sessions where we will create community while baking delicious treats to share with the congregation at upcoming Temple Beth El events. -
Sunday ,
DecDecember 7 , 2025Judaica Shop Open
Sunday, Dec 7th 9:15 am to 12:00 pm
Temple Beth El Sisterhood runs our Judaica shop, the only dedicated Judaica shop in Madison. Stock up on Hanukkah, Shabbat, and other Judaica items. -
Sunday ,
DecDecember 7 , 2025Sunday School for Adults
Sunday, Dec 7th 9:30 am to 10:30 am
This monthly course is an opportunity for adults who missed having a formal Jewish education, or would like a refresher, to have a parallel learning experience while their students are in Religious School. -
Sunday ,
DecDecember 7 , 2025Parent/Guardian Koffee Kibbitz
Sunday, Dec 7th 9:30 am to 10:30 am
Gather at Café Panim with other parents/guardians from your student's grade and get to know each other while your students are in Religious School. -
Tuesday ,
DecDecember 9 , 2025Board Meeting
Tuesday, Dec 9th 7:30 pm to 8:30 pm
-
Wednesday ,
DecDecember 10 , 2025Midrasha
Wednesday, Dec 10th 6:15 pm to 9:00 pm
Midrasha Hebrew High School -
Thursday ,
DecDecember 11 , 2025ROMEO (Retired Old Men Eating Out)
Thursday, Dec 11th 12:00 pm to 1:00 pm
-
Thursday ,
DecDecember 11 , 2025Congregational Book Club
Thursday, Dec 11th 4:00 pm to 5:30 pm
Join us in reading and discussion of challenging, but accessible, contemporary Jewish writings. -
Friday ,
DecDecember 12 , 2025Pre-Shabbat Nosh
Friday, Dec 12th 5:15 pm to 6:00 pm
Please join us for a light nosh before services. -
Sunday ,
DecDecember 14 , 2025Judaica Shop Open
Sunday, Dec 14th 9:00 am to 12:00 pm
Temple Beth El Sisterhood runs our Judaica shop, the only dedicated Judaica shop in Madison. Stock up on Hanukkah, Shabbat, and other Judaica items. -
Sunday ,
DecDecember 14 , 2025Parent/Guardian Koffee Kibbitz
Sunday, Dec 14th 9:30 am to 10:30 am
Gather at Café Panim with other parents/guardians from your student's grade and get to know each other while your students are in Religious School. -
Sunday ,
DecDecember 14 , 2025A Whole Latke Fun: Hanukkah Party for Families with Young Kids
Sunday, Dec 14th 4:00 pm to 6:00 pm
Enjoy a delicious latke and pasta bar, a festive song session, a Hanukkah story, dreidel spinning, cookie decorating, Hanukkah-themed crafts, and so much more to usher in the first night of Hanukkah together. -
Sunday ,
DecDecember 14 , 2025MaTTY Hanukkah Party
Sunday, Dec 14th 4:00 pm to 8:00 pm
-
Monday ,
DecDecember 15 , 2025Judaica Shop Open
Monday, Dec 15th 11:00 am to 1:00 pm
Temple Beth El Sisterhood runs our Judaica shop, the only dedicated Judaica shop in Madison. Stock up on Hanukkah, Shabbat, and other Judaica items. -
Monday ,
DecDecember 15 , 2025Fiber Arts Schmooze
Monday, Dec 15th 7:00 pm to 8:30 pm
Join friends at TBE for an evening of knitting, crocheting, stitching, and friendship! -
Tuesday ,
DecDecember 16 , 2025Judaica Shop Open
Tuesday, Dec 16th 11:00 am to 1:00 pm
Temple Beth El Sisterhood runs our Judaica shop, the only dedicated Judaica shop in Madison. Stock up on Hanukkah, Shabbat, and other Judaica items. -
Tuesday ,
DecDecember 16 , 2025Serve Supper at the Catholic Multicultural Center
Tuesday, Dec 16th 3:30 pm to 5:30 pm
Join fellow TBE volunteers on the third Tuesday of each month to help serve dinner and clean up. -
Tuesday ,
DecDecember 16 , 2025MJND (20s and 30s) Latke Making Party
Tuesday, Dec 16th 5:00 pm to 7:30 pm
MJND (20s and 30s) will be frying latkes in the TBE kitchen using mixtures that guests bring themselves. -
Tuesday ,
DecDecember 16 , 2025Environment and Climate Change Action Team Meeting
Tuesday, Dec 16th 7:00 pm to 8:00 pm
Join our action team as we make plans to engage the congregation in activities that raise awareness about environmental issues. We meet on Zoom. -
Wednesday ,
DecDecember 17 , 2025Sisterhood "Monthly Mingle" Lunch
Wednesday, Dec 17th 12:00 pm to 1:00 pm
Join us for a Sisterhood lunch! -
Wednesday ,
DecDecember 17 , 2025Midrasha
Wednesday, Dec 17th 6:15 pm to 9:00 pm
Midrasha Hebrew High School -
Thursday ,
DecDecember 18 , 2025Play Mahjong with Sisterhood
Thursday, Dec 18th 1:30 pm to 3:30 pm
Join Sisterhood for a fun afternoon of Mahjong! -
Friday ,
DecDecember 19 , 2025Pre-Shabbat Nosh
Friday, Dec 19th 5:15 pm to 6:00 pm
Please join us for a light nosh before services. -
Wednesday ,
DecDecember 24 , 2025Office Closes at 12:00 pm
Wednesday, Dec 24th 12:00 pm to 5:00 pm
-
Thursday ,
DecDecember 25 , 2025Office Closed
Thursday, Dec 25th (All day)
-
Friday ,
DecDecember 26 , 2025Pre-Shabbat Nosh
Friday, Dec 26th 5:15 pm to 6:00 pm
Please join us for a light nosh before services. -
Wednesday ,
DecDecember 31 , 2025Office Closes at 12:00 pm
Wednesday, Dec 31st 12:00 pm to 5:00 pm
-
Wednesday ,
DecDecember 31 , 2025Singles Creating Community Dinner
Wednesday, Dec 31st 6:00 pm to 8:00 pm
Join the Singles Creating Community group for a dinner gathering. -
Thursday ,
JanJanuary 1 , 2026Office Closed for New Year's Day
Thursday, Jan 1st (All day)
-
Thursday ,
JanJanuary 8 , 2026Sisterhood "Monthly Mingle" Lunch
Thursday, Jan 8th 12:00 pm to 1:00 pm
Join us for a Sisterhood lunch! -
Thursday ,
JanJanuary 8 , 2026Social Action Committee Meeting
Thursday, Jan 8th 7:00 pm to 9:00 pm
Social Action Committee meetings are held at 7:00 pm on the first Thursday of most months at Temple Beth El. -
Friday ,
JanJanuary 9 , 2026Singles Creating Community Coffee Klatch
Friday, Jan 9th 9:00 am to 11:00 am
Please join the Singles Creating Community group for breakfast. -
Saturday ,
JanJanuary 10 , 2026Community Havdalah
Saturday, Jan 10th 4:00 pm to 7:00 pm
Let's create warmth on a cold winter night through a community Havdalah, a heartfelt and unifying experience that celebrates the close of Shabbat and the beginning of a new week. -
Tuesday ,
JanJanuary 13 , 2026Board Meeting
Tuesday, Jan 13th 7:30 pm to 8:30 pm
-
Friday ,
JanJanuary 16 , 2026ROMEO (Retired Old Men Eating Out)
Friday, Jan 16th 11:45 am to 2:00 pm
-
Sunday ,
JanJanuary 18 , 2026Shaping a Stronger City: Downtown Madison Inc's Vision for Equity, Growth, and Community
Sunday, Jan 18th 9:30 am to 11:30 am
Sisterhood & Men's Club Annual Joint Event discussing the future of Downtown Madison
TBE BLOG
Blessing of the Animals on Saturday, October 25
Thursday, Oct 16 10:01amTBE will have a Blessing of the Animals in celebratio
Thinking About the Environment
Thursday, Oct 16 8:05amHarvest Time at the Food Pantry Gardens
Thursday, Oct 16 7:57amTemple Beth El • 2702 Arbor Drive, Madison, WI 53711 • 608-238-3123 • Contact Us
Click to find us on social media: 
![]()

Thank you to our gold-level sponsor, Cress Funeral Services
Privacy Settings | Privacy Policy | Member Terms
©2025 All rights reserved. Find out more about ShulCloud